Stop 5: Zion National Park
(Days Needed: 2-3)
It’s been an exhilarating five days of venturing across southern Utah. We’ve checked off eighty percent of our Mighty Five bucket list, and only one stop remains before we can bask in the glory of conquering all five parks!
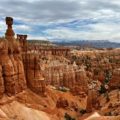
After saying goodbye to the endearing hoodoos of Bryce Canyon, it’s time to set our sights west once more, where the grand finale of the trip, Zion National Park, awaits us.
Zion’s unmistakable beauty, including its majestic cliffs and canyons, has earned it a spot on many global outdoor bucket lists, and that’s evident based on the park’s recent visitation numbers. Over the past several years, the park has averaged a staggering five million visitors, making it the second-most visited national park in the United States.
There are three primary ways into the park. The northwest entrance leads into a small, standalone section of the park known as Kolob Canyon, while the eastern and southern gates lead visitors to the heart of the park, Zion Canyon.
While many visitors tend to dedicate all their time to Zion Canyon, which houses notable points of interest such as The Narrows and Angels Landing, Kolob Canyon makes for an ideal day trip if you’re looking to escape the worst of the crowds.

Your Grand Entrance
Since you’ll be coming to Zion from the east, your grand entrance into the park will come via Scenic Byway 9. Inside the park’s boundaries, this road transitions into the Zion-Mt. Carmel Highway, and boy, is this drive a treat!
Just inside the park, the scenery quickly morphs into a dramatic setting filled with red and white cliffs and sandstone domes, with ponderosa pines dotting the landscape.
During this stretch, you’ll encounter several distinguishable features, including Checkerboard Mesa, a towering white dome defined by its crisscrossed pattern. You’ll also notice plenty of turnouts where you can scale the surrounding slick rock to gain elevated views of the canyon and the park’s picturesque road snaking through. As you hop around, keep your eyes peeled for the bighorn sheep that are also big fans of these views!
Six miles into the park, a handful of trails launch from the same parking area, including one of the park’s best short hikes, Zion Canyon Overlook.
This easy, out-and-back route clocks in at just over a mile round trip and makes for the perfect introductory activity in the park. The hike begins with a short ascent up a stairway before transitioning to a mostly-flat cliffside path overlooking Pine Creek Canyon.
At the half-mile mark, you’ll reach the final lookout point, where you’ll get your first jaw-dropping views into Zion Canyon. Several notable landmarks, including Bridge Mountain and the imposing East Temple, can be seen here. It’s a postcard-worthy setting and one of the best family activities in the park, given its ease of access.
Just beyond this hiking area lies the Zion-Mt. Caramel Tunnel. This historic, 1.1-mile tunnel greatly enhanced the accessibility to the park in 1930, and its narrow, dark nature adds an unmistakable thrill to the drive.
Due to its compact size, traffic is reduced to an alternating flow between 8 a.m. and 8 p.m., and larger vehicles will need to purchase a $15 permit before heading through.
As you near the tunnel’s exit, be prepared for dazzling Zion Mountain views that will leave you awestruck. From the mouth of the tunnel, the road slowly descends over a series of switchbacks into the Zion Canyon valley. This stretch is easily one of the most scenic drives I’ve ever done. If you’re not in the driver’s seat, don’t forget to hit record on your phone!
After twisting your way down to the canyon floor, you’ll reach Canyon Junction Bridge, one of the most photographed areas of the park. At this point, you’ll first cross paths with the Virgin River, the life force that’s carved out much of the landscape around it.
On your right-hand side, you’ll also notice Zion Park Road, the gateway to Zion Canyon and many of the park’s activities. Because this area is so highly trafficked, personal vehicles aren’t permitted to access the road except during the off-season (December-February).
Instead, you’ll need to utilize the park’s efficient shuttle system to reach these highly sought-after areas (more on that in a minute). But before doing so, you’ll want to finish the scenic drive to the park’s south entrance and the town of Springdale.
Exploring the South End of the Park
The distance from Canyon Junction Bridge to the park’s south entrance is just two miles, but there’s still a decent amount to unpack along this stretch.
The park’s two main campgrounds, South Campground and Watchman Campground, are each located along this stretch and provide convenient access to the park’s most important amenities, including the shuttle system. Each campground also boasts outstanding, up-close views of the Zion Mountains, with the Virgin River flowing right past many of the sites.
Down the road, you’ll find the park’s history museum and nature center, where you’ll find frequent exhibits and plenty of interesting tidbits related to the park’s geology, wildlife, and history.
Visitors looking for information like trail conditions and an up-to-date shuttle schedule can stop in the park’s main visitor center just inside the south entrance.
For an easy activity in the area, park-goers can hop on the Pa’rus Trail that meanders along the banks of the Virgin River. This stroll is suitable for all ages and is the only bike and pet-friendly trail in the park.
Along the way, you’ll get sensational views of the Zion Mountains and cross several lovely bridges over the river. It’s also a prime area for enjoying wildflowers and spotting mule deer!
During evening hours, you can take the trail to its end (1.7 miles each way) at Canyon Junction Bridge, one of the most-popular sunset points in the park. During the final minutes of daylight, the canyon’s rocks burn fiery shades of orange and red that draw oohs and ahhs from spectators until the sun disappears.
For a slightly more intense workout and even more dramatic views, I’d suggest venturing out onto the Watchman Trail. This route, often overlooked in favor of more well-known hikes, has high-quality views and less foot traffic, which makes it one of the most appealing two-to-three-hour activities in the park.
The trail totals just over three miles and takes hikers up a steady but not-too-steep incline to a plateau with expansive views of Springdale and a close-up look at one of Zion’s most iconic features, the Watchman. It’s also another popular spot for Bighorn Sheep, so make sure to bring along your binoculars! Like the Pa’rus Trail, you can’t go wrong with catching a sunset here, and I’ve been told it’s not too shabby at sunrise either!

Zion Canyon
After completing your introductory drive into the park, you’ll likely be itching to get to the center of the action in Zion Canyon.
Whether your mission is to hike Angel’s Landing, wade through the Narrows, or sightsee off the canyon’s scenic drive, you’ll want to familiarize yourself with the park’s shuttle system, which will be your primary means of getting to all of the canyon’s most popular spots.
The shuttle system consists of two separate lines: the Springdale Line and the Zion Canyon Line. The Springdale Line consists of nine different stops, and if you’re staying at one of the town’s many lodging options, you should have easy access to one of these.
Once picked up, the shuttle will transport you to the park’s bike and pedestrian entrance, where the first Zion shuttle stop is just steps away.
The Zion Canyon line also has nine stops, and a park map will help you decipher which stop your targeted activities are located. Because shuttle times vary by season, I’d suggest checking out the park’s website before your arrival.
From easy paved paths to rocky 2,000-foot climbs, Zion Canyon is the home to a wide array of activities with something suitable for every visitor.
One popular activity with families and adventurers alike is the Emerald Pools. Located near the Zion Lodge, these three small, yet serene bodies of water are staggered down the canyon’s rim and fed by a collection of plunging waterfalls.
If you want to keep things short and easy, you can hike to the lower pool on the .6-mile paved path, but if you opt for the moderate three-mile loop, you’ll have access to all three.
The upper pool is the most-impressive, as it features a 300-foot waterfall tumbling down the giant stone wall surrounding it. It’s a tranquil scene that makes for a well-deserved snack break!
I should mention that while I’d recommend this hike any time of the year, water levels can vary significantly with the seasons. For the latest trail conditions, I’d suggest using the AllTrails app, which can also help you map out your route.
Angels Landing
If a trip to Zion has been on your bucket list for a while, there’s a good chance hiking Angels Landing has something to do with that. The hike, which makes the shortlist for most popular trails in the United States, is known for its adrenaline-pumping, half-mile stretch across a narrow ridge with thousand-foot drop-offs on either side. While there are chains and carved-out footsteps to keep hikers more secure, it’s not an activity for the faint of heart!
To get there, hikers will start with an ascent up the West Rim Trail, a steep path that ends with over a dozen switchbacks known as the Walter Wiggles (the park’s first superintendent). At about 1.7 miles, you’ll reach Scout Lookout, which provides sweeping views of the surrounding canyon. Even if you aren’t up for the nerve-racking final stretch, the vistas from this point are well worth the climb!
Because of the trail’s incredibly heavy congestion in recent years, the park recently implemented a lottery system that requires hikers to have a permit to reach Angels Landing. At this junction, you’ll likely need to show these credentials to a ranger, and from there, it’s on to the acclaimed final ascent!
As you make your way out onto the ridge, take your time. I can’t emphasize that enough. Don’t let anyone rush you!
While the trail should be less prone to gridlocking with the permit system, it will still be slow-going. If you can get out on the day’s first shuttle, that will help tremendously. The crowds are arguably the biggest deterrent in completing the hike, so timing things right makes all the difference.
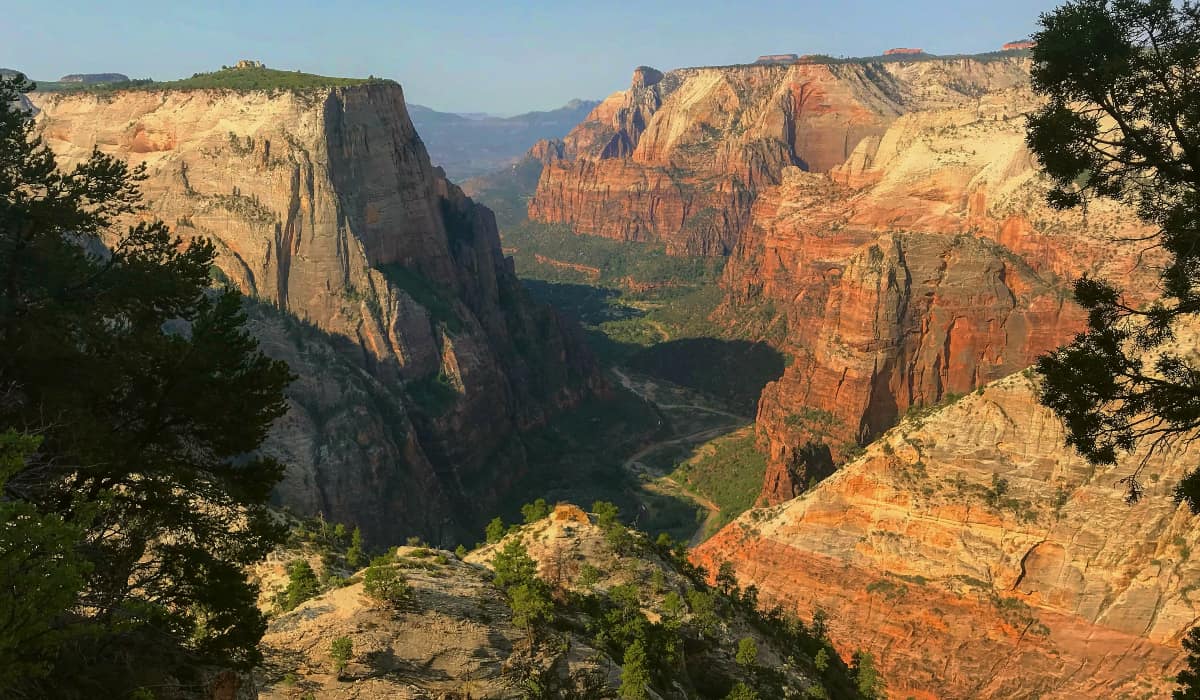
Once you’ve completed the narrow, 500-foot climb to the landing a 20th-century explorer claimed “only an angel could land on,” get ready for a feeling of jubilation and awe! The 360-degree views are no doubt fit for an angel, and while it may not be the highest viewpoint in the park, it’s undoubtedly the most dramatic. You’ll see bright orange cliff faces lurking over you and the Virgin River flowing 1500 feet below.
Before heading back down, refuel with plenty of fluids and revel in your accomplishment with the colony of chipmunks that live there. While you’ll still want to exercise caution during your descent, most hikers would probably agree it’s not quite as daunting as the climb up.
Once you’ve successfully made it back to Scout Lookout, you can continue up the West Rim Trail, where you’ll find more isolated and equally breathtaking views, or head back down so you can safely post your brag-worthy accomplishment across all social media platforms!

The Narrows
Of all the national parks I’ve been to, few possess two completely different types of trails that deserve to inclusion on any “best day hikes in the U.S.” list.
That’s the case at Zion, as The Narrows offers a completely different experience from Angels Landing, but it’s an experience you’ll remember doing forever. And though it’s still a challenge, you can breathe easier knowing that heights won’t play a factor.
The first thing to know about hiking the Narrows is that you’ll be wading upstream, so some preparation is required.
The water temperature will vary greatly depending on the time of year, but at the very least, you’ll want to layer up in quick-drying clothes and throw on a pair of neoprene socks (help keep your feet dry) if you have them. You’ll also need your sturdiest pair of shoes, a bag to keep your belongings dry, and a hiking pole or stick, which will assist in your balance and help you feel your way through the water.
I remember questioning whether I really needed a pole to complete the hike. I quickly found out the answer was yes. It helped tremendously!
If you need any clothing or equipment, you can head into Springdale and choose from several outfitters like Zion Guru.
The first mile of the trail is dry and paved, so if you’d like a taste of the Narrows without getting wet or exerting a ton of energy, it’s a nice option. But if you want the true Narrows experience, you’ll need to go further.
At the mile mark, it’s time to get wet!
The river’s flow is measured in CFS (cubic feet per second), and when the level is under 50 CFS, most water levels you’ll encounter will typically be somewhere between ankle and knee-deep. If the CFS level is close to 100, expect some water to go beyond your waist and possibly to your chest. At 150, water levels are deemed dangerous, and the park will close the trail until conditions improve.
Because this canyon can flash flood quickly, water levels change quickly, so staying up-to-date on current conditions is ultra important.
During your first mile trudging through the water, you’ll pass several dry land banks that will give you a short break from all the wading. Hiking upstream can be taxing, especially when you’re first starting.
As you continue, you’ll pass several waterfalls cascading down the canyon and unique carvings throughout the canyon’s walls. The further you go, the more narrow and tall the walls become. Two miles upstream is the Wall Street section, where the width between walls shrinks to less than twenty feet!
Although hikers can go as far as Big Springs, that requires 3.7 miles of wading each way and almost 10 miles of total hiking. I’d recommend trying to make it to Wall Street, and once you’ve had time to grab some awesome photos, start heading back.
The journey up and back down the river can be exhausting, but much like Angels’ Landing, you’ll be proud to say you conquered The Narrows!
Observation Point
The first time I visited Zion in 2018, my wife and I completed an epic 8-mile hike up to Observation Point, an unbelievable top-down viewpoint of Zion Canyon. Sadly, a significant rock fall damaged that trail along with Hidden Canyon, and they’ve both been closed since. Fortunately, there’s another route up to the million-dollar viewpoint, though it technically begins outside the park’s boundaries.
The updated trail, known as the Observation Point via East Mesa Trail, is located ten miles north of the park’s eastern entrance and can be difficult to reach by car. Because of this, Zion Ponderosa Ranch Resort provides a shuttle service to the trailhead for a small fee.
The new route, which totals seven miles, is far easier than the original, as the hike mostly ebbs and flows through a peaceful Ponderosa Pine forest.
As pleasant as the hike is, by the middle, you may start to wonder if the activity was really the best way to spend your precious time at Zion. Rest assured, that idea will be a fleeting thought once you make it to Observation Point. The downright jaw-dropping vistas there will have you feeling like you’re sitting on the throne of the world’s most majestic landscape.
There’s also plenty of space to spread out while you admire the bird’s eye perspective. Look far below to observe tiny humans making their way up to Angels Landing!
For your itinerary’s sake, I should add that if you’d like to complete this hike, you may want to consider doing it first thing on the day of your arrival, so you won’t have to re-trace your drive back through the park’s eastern entrance.

Kolob Canyon
After spending some time in the heart of Zion, you may be seeking a short hiatus from the worst of the crowds. Kolob Canyon, located off of I-15 forty miles northwest of Springdale, will give you the respite you’re looking for while blowing you away with its distinguishable beauty.
Although the district is compact and doesn’t possess all of the amenities that Zion Canyon does, it still packs an impressive punch with its crimson-red box canyons and uniquely shaped sandstone cliff faces begging to be photographed.
There is only one primary road that winds through the district, and it ends just five miles in. Even so, it’s an inspiring drive that begins with mostly-green rolling mountains before giving way to enormous clusters of red rock.
You’ll get your first glimpse of these handsome rocks less than a mile in, and they become increasingly captivating as you get closer. During the drive, you’ll encounter plenty of pull-offs to admire the views, and a handful of trails launch from these areas.
One of the more popular hikes I’d recommend is the Middle Taylor Creek Fork Trail. This 5-mile trek takes you to the double arch alcove, a unique cave-like nook carved into one of the massive red rock formations.
At its beginning, the lightly moderate trail drops you down a set of stairs leading to Taylor Creek, and from that point, you’ll quickly pick up on the theme of this hike: You’ll be crossing the creek more than a few times before you reach the alcove.
Don’t let that deter you. Hiking with the gently flowing water next to (on?) the trail is quite pleasant, and the creek is typically shallow enough to cross with ease. Even the more difficult crossings will have stones scattered across to assist you. Just be aware that your feet may get just a bit damp.
Once you reach the alcove, you’ll feel the cool, cave-like temperatures as you admire the rock’s fascinating colored streaks and the two arch-like shapes carved into it.
As you continue down the district’s scenic road, you’ll eventually reach Kolob Viewpoint, the most popular area to marvel at the cliffside canyons.
The Timber Creek Overlook Trail, which launches here, takes hikers up an easily-climbed ridge leading to panoramic views of Kolob Canyon, with mountains, buttes, valleys, and creeks filling the rest of the landscape. If it’s your last night at Zion, you can’t go wrong with this spot for a final sunset!
The End of An Epic Road Trip
After two thrilling days unpacking one of America’s most extraordinary national parks (didn’t I tell you it was a fitting grand finale?) and hopefully adding a check-mark or two to your bucket list, this epic road trip is sadly coming to an end.
But let’s be honest. You’re probably on the brink of exhaustion after exploring five insanely beautiful and unique destinations, and your sunburned skin and blistered feet could use some time to heal.
Though it’s been a busy seven days, I think you’ll agree, Utah’s national parks are just close enough to fit them into a week-long road trip and explore the best of each one. What am I saying? Of course you’ll agree. You have the photos and memories to prove it!
Hopefully, there were no major bumps along the way, and Utah blew past your expectations the same way it did mine on my first visit to the Mighty Five. Now the only question that remains is- Where are you heading next? There’s plenty of globe still waiting to be strolled.
Sample Itinerary: Day 6
- Arrive early via the park’s eastern entrance and enjoy the views from the breathtaking Zion-Mt. Carmel Highway
- Take the 1-mile Zion Canyon Overlook Hike just before the tunnel
- Finish the remainder of the drive that leads to the visitor center. Stop in for park and shuttle information.
- Exit the park and head to one of Springdale’s outfitters for any gear needed for The Narrows
- Leave your vehicle in town and use the park’s shuttle system to get to The Narrows. Hike out to Wall Street and back (6 miles RT)
- Head back for a late lunch/early dinner in town
- Take the shuttle back into the park and enjoy a leisurely stroll on the Pa’arus Trail for sunset
Sample Itinerary: Day 7
- Grab an early cup of coffee in town and get out on the first shuttle to Angels Landing
- Complete the bucket-list worthy 4.5-mile hike to Angels Landing (or alternatively hike to Scout Lookout and continue another half-mile past on the West Rim for equally spectacular, less daunting views)
- Refuel with a snack then head to the Emerald Pools (hike to the easily accessed lower pool or explore all three pools (3 miles RT)
- Head back to Springdale for another late lunch/early dinner
- Wrap up your day with a partial hike up the Watchman Trail or make the 40-mile drive to Kolob Canyon for a scenic sunset drive
Where to Eat
- Zion Canyon Brew Pub (burgers, pub fare, and local beer)
- FeelLove Coffee (coffee, tea, pastries)
- Whiptail Grill (classic Mexican fare, burgers, ribs)
- Camp Outpost (sandwiches, meat plates, salads)
- Bit & Spur Saloon (tex mex, margaritas)
- Oscar’s Cafe (omelettes, burritos, sandwiches, burgers)
- King’s Landing Bistro (upscale American fare, dessert, cocktails)
- Deep Creek Coffee Company (bagels, smoothies, light lunch fare, coffee)
- Zion Pizza & Noodle Co. (pizza, pasta, calzones, salad)
- MeMe’s Cafe (breakfast sandwiches, crepes, burgers)
Where to Stay:
- Zion Lodge (Zion Canyon)
- South Campground (south end of park)
- Watchman Campground (south end of park)
- Cable Mountain Lodge (steps from park’s south entrance)
- Best Western Plus Zion Canyon Inn & Suites (1 mile)
- Holiday Inn Express Springdale (1.5 miles)
- Red Rock Inn (1 mile)
- Hampton Inn & Suites Springdale (1 mile)
- Zion River Resort RV Park & Campground (13 miles)
- Fairfield Inn & Suites by Marriott Virgin Zion National Park (13 miles)